My baby girl's room has a 13 foot wall behind her crib. What on earth do you do with that? I had seen the paper flowers, also the paper butterflies out in blogland, but figured it needed just a little extra something. At first I thought about a cute quote. But, then I saw people turning their pictures into sillhouettes and framing those. I used that as a springboard for this....
So, first I used my super nice neighbor's cricket to cut out LOTS of different size flowers from paper I bought at Michael's (LOVE that store!) and also butterflies (on sparkly white paper). I took a marker and rolled the edges of the flowers in so they would have some dimension.

Then I had my wonderful hubby take a picture of our baby girl walking toward me, then traced the outline on a peice of tracing paper (moving, adding, cuting out what I wanted)
I learned that tracing paper will not work on a projector and didn't care to spend money on projector sheets. So I glued the tracing paper to some scrap paper and cut it out, then taped it to the projector...
And traced it on my MDF board from Home Depot.
Then used another super nice neighbor's scroll saw to cut it out. Because it was so tall, I had to cut it in half. I haven't used one of these since 7th grade shop (where I learned how to get the nice boys to do the projects for me) :) So, I was pleasently surprised when I didn't completely ruin it (it just might have helped that I said a prayer beforehand, "Heavenly Father, I can't afford to buy another MDF board right now, so please bless that I won't royally mess this up, Amen")
I painted it Antique White (I just used Acryllic paint) and cut out paper from the same pad I used for the flowers to resemble the "clothes", which I mod podged on. I changed the jacket material to match the skirt, it just looked better. Then I put ribbon on to distinguish a bit and used the same ribbon for a headband, with one of the smaller flowers and a larger stone/gem thing in the middle. Then I just put a layer of Varnish over all of it for a bit of protection.
My 4-year old got a hold of the camer and took a picture of me :)
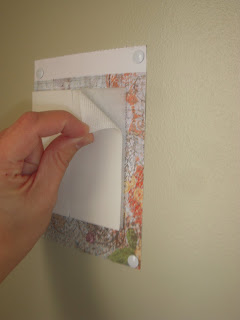
I was wracking my brain how to hang up the sillhouette because most screws for stuff are too long and would go right through. Well, I was looking at Walmart (yes, I do shop there) and they had these cool velcro things to hang stuff up with. Perfect! I didn't want to rip all the paint off the wall, so I attached a small sheet of paper with my pushpins (I added more than shown in this photo), then put the velcro together and stuck it on the paper. THEN I stuck the sillhouette on top so the velcro would be lined up perfectly.
Then came the fun part... I used flat topped white pushpins to attatch all the flowers and butterflies (they blended in with the butterflies and were like the "middle" of the flowers) and just kind of started putting them on and stepping back every now and then to make sure the were following the general shape I wanted them.
I couldn't get a pic of the whole wall at once, so hopefully you can see where they overlap. But here's the finished project.....
Here are the link parties I've linked up to:
http://tatertotsandjello.blogspot.com/2011/04/weekend-wrap-up-party-and-ladybug.html?utm_source=feedburner&utm_medium=feed&utm_campaign=Feed:%20blogspot/OivM%20(Tatertots%20and%20Jello)


10 comments:
woow. that's really beautiful! so talented. ;) love that it's her silhouette!
oh my gosh, that is amazing! you really filled that space with something special. and your blog title is cracking me up! so glad i saw your link at the diy showoff!
I love this too... I just might have to do this for my daughter...
So cute! You're so talented! I need to come see it in person!
this turned out so darling. So happy it turned out for you
very cute!
I love it, Aurora! So creative and whimsical. Maybe you can come help with my bare walls. :)
THIS IS MY DAUGHTER-IN-LAW FOR YOU! Aroura, it is awesome and the profile is Madeline to a "T". Thanks for sharing your creativity. I don't know where you find the time nor the energy!
Vicki
Aw! How pretty!! I love that you used so many flowers hehe. Very girly and fun :)
Thanks for linking up to Your Whims Wednesday!
Hi, Aroura! I'm admiring all your creative posts here so can you please share them with us at the Creative Bloggers' Party & Hop? Hope to see you there at the party :)
Post a Comment